-
-
First prepare your 3D model for multi color printing.
-
Split the model into several parts, one part for each color.
-
Write each part into one separate .stl file
-
-
-
Go go the Printer Settings and set the number of Extruders to the number of colors you want to use - 2 in our case.
-
Also set "Single Extruder Multi Material" to On
-
Then go to the Custom G-code section and set the "Tool Change G-code" to "M600"
-
Disable the wipe tower in "Print Settings --> Multiple Extruders". It's not needed because of our custom wipe blocks.
-
The G-code will later contain the tool change commands (Txxx) which will be ignored during print. Due to our custom G-code for tool changes, there will be an additional M600 command at each tool change. M600 is the semi-automatic filament change command and lets you manually change the filament whenever a MMU would do so.
-
-
-
Carefully arrange the single parts to match each other. If you load all parts at once and the multi extruders are set up, PrusaSlicer will arrange the parts according to the coordinates given in the stl. If you do a proper job in the CAD system, all will be arranged properly without manual intervention.
-
Then assign the according "Extruder" to each part, thus also assigning a different color.
-
Add two purge objects (rectangles of the same height than the different color layers) to the bottom right of the print bed
-
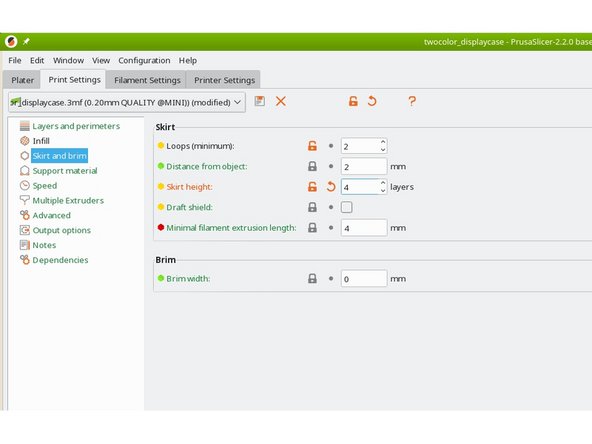
Enable the "skirt" in print settings with as many loops as the number of colors. Also set the skirt height to the number of multi color layers.
-
The skirt and the purge objects will help you to clear the nozzle after filament change and not get mixed colors.
-
-
-
Now slice and save the G-code.
-
Open the G-code with a text editor. Search for every M600 command.
-
Right after each M600 theres a tool change command "T0", "T1" etc. T0 corresponds to your first color, T1 to the second and so on.
-
Scan through the G-Code and write down the sequence of color changes so that you know which filament to insert during the print.
-
Of course you don't need to do this if you've got only two colors. On a filament change there are not many options in this case...
-
Now print your G-code. The printer will eject the filament at print start. Make sure that you re-insert or exchange it to the color your first print section should start with.
-
Stay close to the printer and exchange filament whenever indicated.
-
After filament change, you may hold the oozed filament with tweezers to avoid ooze getting dragged onto the print.
-
Cancel: I did not complete this guide.
2 other people completed this guide.
One Comment
Thank you Peter! That was full of very useful pointers!
Here are a couple observations:
1. It works even better to NOT subtract the text from the actual part, and rather use the text as a modifier on the part and assign it a different extruder. This prevents the "Elephant foot compensation" from leaving gaps around the text.
2. Since PrusaSlicer 2.6, the text embossing tool lets you create the text modifier in just a couple of clicks, dirrectly in PrusaSlicer. I printed the same part 20 times but with different text in no time.


